OM# Documentation
Patch editor: Basics of visual programming
This page describes the main features and manipulations involved in creating, configuring and connecting boxes in visual programs. It points to the other sections of this documentation for details on every specific features.

Everything starts in the patch editor. Use the “File” menu to create a new patch, or open an existing patch, and display it in the patch editor window.
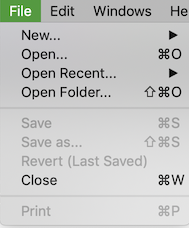
The different options in the “File” menu are:
- “New” to open a new patch ( Ctrl/⌘+N ) or other type of OM# document,
- “Open” / Ctrl/⌘+O allows you to choose an existing document to open,
- “Open Recent…” to retrieve most-recently opened documents,
- “Open Folder…” ( Ctrl/⌘+shift+O ) open all the OM#-compatible files that are inside a given directory.
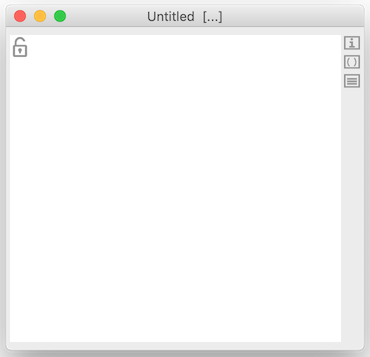
The “new” patch is an empty white page, ready for you to fill-in. You will have to add boxes and connect them, in order to create visual programs.

The patch editor has an optional side panel on the right, which opens with the buttons


on the right-border of the window (or corresponding commands and short-cuts in the “Edit” menu), in order to display:
Boxes
 A box is a rectangular frame displaying a name (generally, the name of the function, object or embedded component it is referring to), an icon (sometimes) and a number of inlets and outlets.
Inlets (at the top) represent inputs of the function call. They corresponds to the arguments of a function box or embedded sub-patch, or the attributes of an object constructor.
Outlets represent the returned value(s).
To create a box:
-
 Type N or double click anywhere on the patch editor background to create a function or object box.
In the temporary text-input field, type a simple value, or the name of the object you wish to add in the patch, then press ENTER.
 -
Use the “Boxes/Add Box…” menu of the patch editor window: just select a box name, then click somewhere in the patch editor.
-
Use the Packages Library tab of the main Session window [ Ctrl/⌘+shift+W ], to also double-click in a function or class icon, and then add it somewhere in the patch editor.
Any Lisp function can be used in a patch editor. However, only a subset of specific/documented functions declared in OM packages are visible in the function library.
 Box inputs allow entering arguments/attribute/parameters to OM# boxes.
Their value can be set “by hand” by just clicking on the input and typing a simple value, or through connections to other boxes (see below).
Documentation: Use the menu “Help/Help Function & Class Reference” or the the Ctrl/⌘+D shortcut to open an auto-generated HTML reference documentation page of a box.
Connections
In order to create a connection, use the mouse to drag from a box output to another box input. If the connection is allowed (for instance, cycles are not permitted and inconsistent with the visual language semantics), the connection line will appear in the patch.

Existing connections can be selected with the mouse, re-routed (e.g. for readability) with “mouse drag”, re-connected somewhere else, or deleted (using the backspace key).
→ See the dedicated page about Connections.
Edits
Undo/Redo
Use the standard Ctrl/⌘+Z / Ctrl/⌘+shift+Z in order to undo/redo your last editing operations.
Move
Patch contents (boxes and connections) can be dragged on the patch editor, and/or from one editor window to another.
Alternatively, the arrow keys ← → ↑ ↓ also move selected boxes. shift + ← → ↑ ↓ performs faster moves.
Delete
Deleted selected contents using the backspace key.
Copy-Cut-Paste
-
The “Edit” menu provides the standard Copy / Cut / Paste commands.
-
Boxes can also be copied and pasted using the standard OS-specific drag&drop combinations: alt + drag&drop on macOS, Ctrl + drag&drop on Windows/Linux.
All these operations can be performed on the same editor window, or from one editor window to another.
Select All
The “Edit/Select all…” menu command / Ctrl/⌘+A selects everything in the patch window.
Align
- The “Edit/Align Boxes” menu command, or shift+A key-combination, automatically adjust the box layout to align positions of neighbour boxes and inputs vs. outputs.
→ See other commands in the Boxes section.
Evaluation
A patch is executed locally by the evaluation request / V of a box, which computes the value of this box and of all required, upstream connected boxes.
Lock
The icons ![]() at the top of the patch window, or the menu “Edit/Edit lock” [ Ctrl/⌘ + E ] allow you lock/unlock the patch editor.
In the lock mode:
at the top of the patch window, or the menu “Edit/Edit lock” [ Ctrl/⌘ + E ] allow you lock/unlock the patch editor.
In the lock mode:
- The patch can not be edited (most commands described in this page are disabled)
- Boxes can be evaluated
- The interface box and value boxes are reactive to simple mouse-clicks.